How to Get Accurate Transcription and Translation
Achieving accurate transcription and translation results with Hope Translator requires understanding the fundamental relationship between sound quality and AI performance. The quality of your audio input directly determines the accuracy of both transcription and translation.

The Foundation: Accurate Transcription
Transcription accuracy is the cornerstone of good translation. If the AI cannot accurately hear and transcribe your speech, the translation will inevitably contain errors. This is why sound quality is absolutely critical to your success with Hope Translator.
Sound Quality Requirements
Clean Audio Input is Essential
The most important factor for accurate transcription is clean, high-quality sound input. Background noise, poor microphone placement, or low-quality audio equipment will significantly degrade transcription accuracy, which in turn affects translation quality.
Internet Connection Requirements
Your internet connection must be strong and reliable for optimal performance. Connect to WiFi whenever possible, as stable internet connectivity is crucial for real-time transcription and translation processing.
Environmental Considerations
- Choose quiet environments when possible
- Minimize background noise and echo
- Avoid areas with multiple competing sound sources
- Consider acoustic treatment for permanent setups
Mobile Solo Mode Setup
Optimal Microphone Placement
For the best results in mobile solo mode, position yourself close to the speaker. The closer you are to the sound source, the clearer the audio input will be, resulting in more accurate transcription.
When You Can't Get Close
If you cannot physically get close to the speaker (e.g., in a large meeting room or auditorium), use a wireless microphone:
- Place the wireless microphone near the speaker
- Position yourself at the back of the room
- Monitor transcription accuracy in real-time
- Adjust microphone placement as needed
Attaching Wireless Microphones to Existing Equipment
For optimal sound quality, you can attach a wireless microphone directly to the speaker's existing microphone. This setup ensures maximum audio clarity and enables effective noise cancellation:
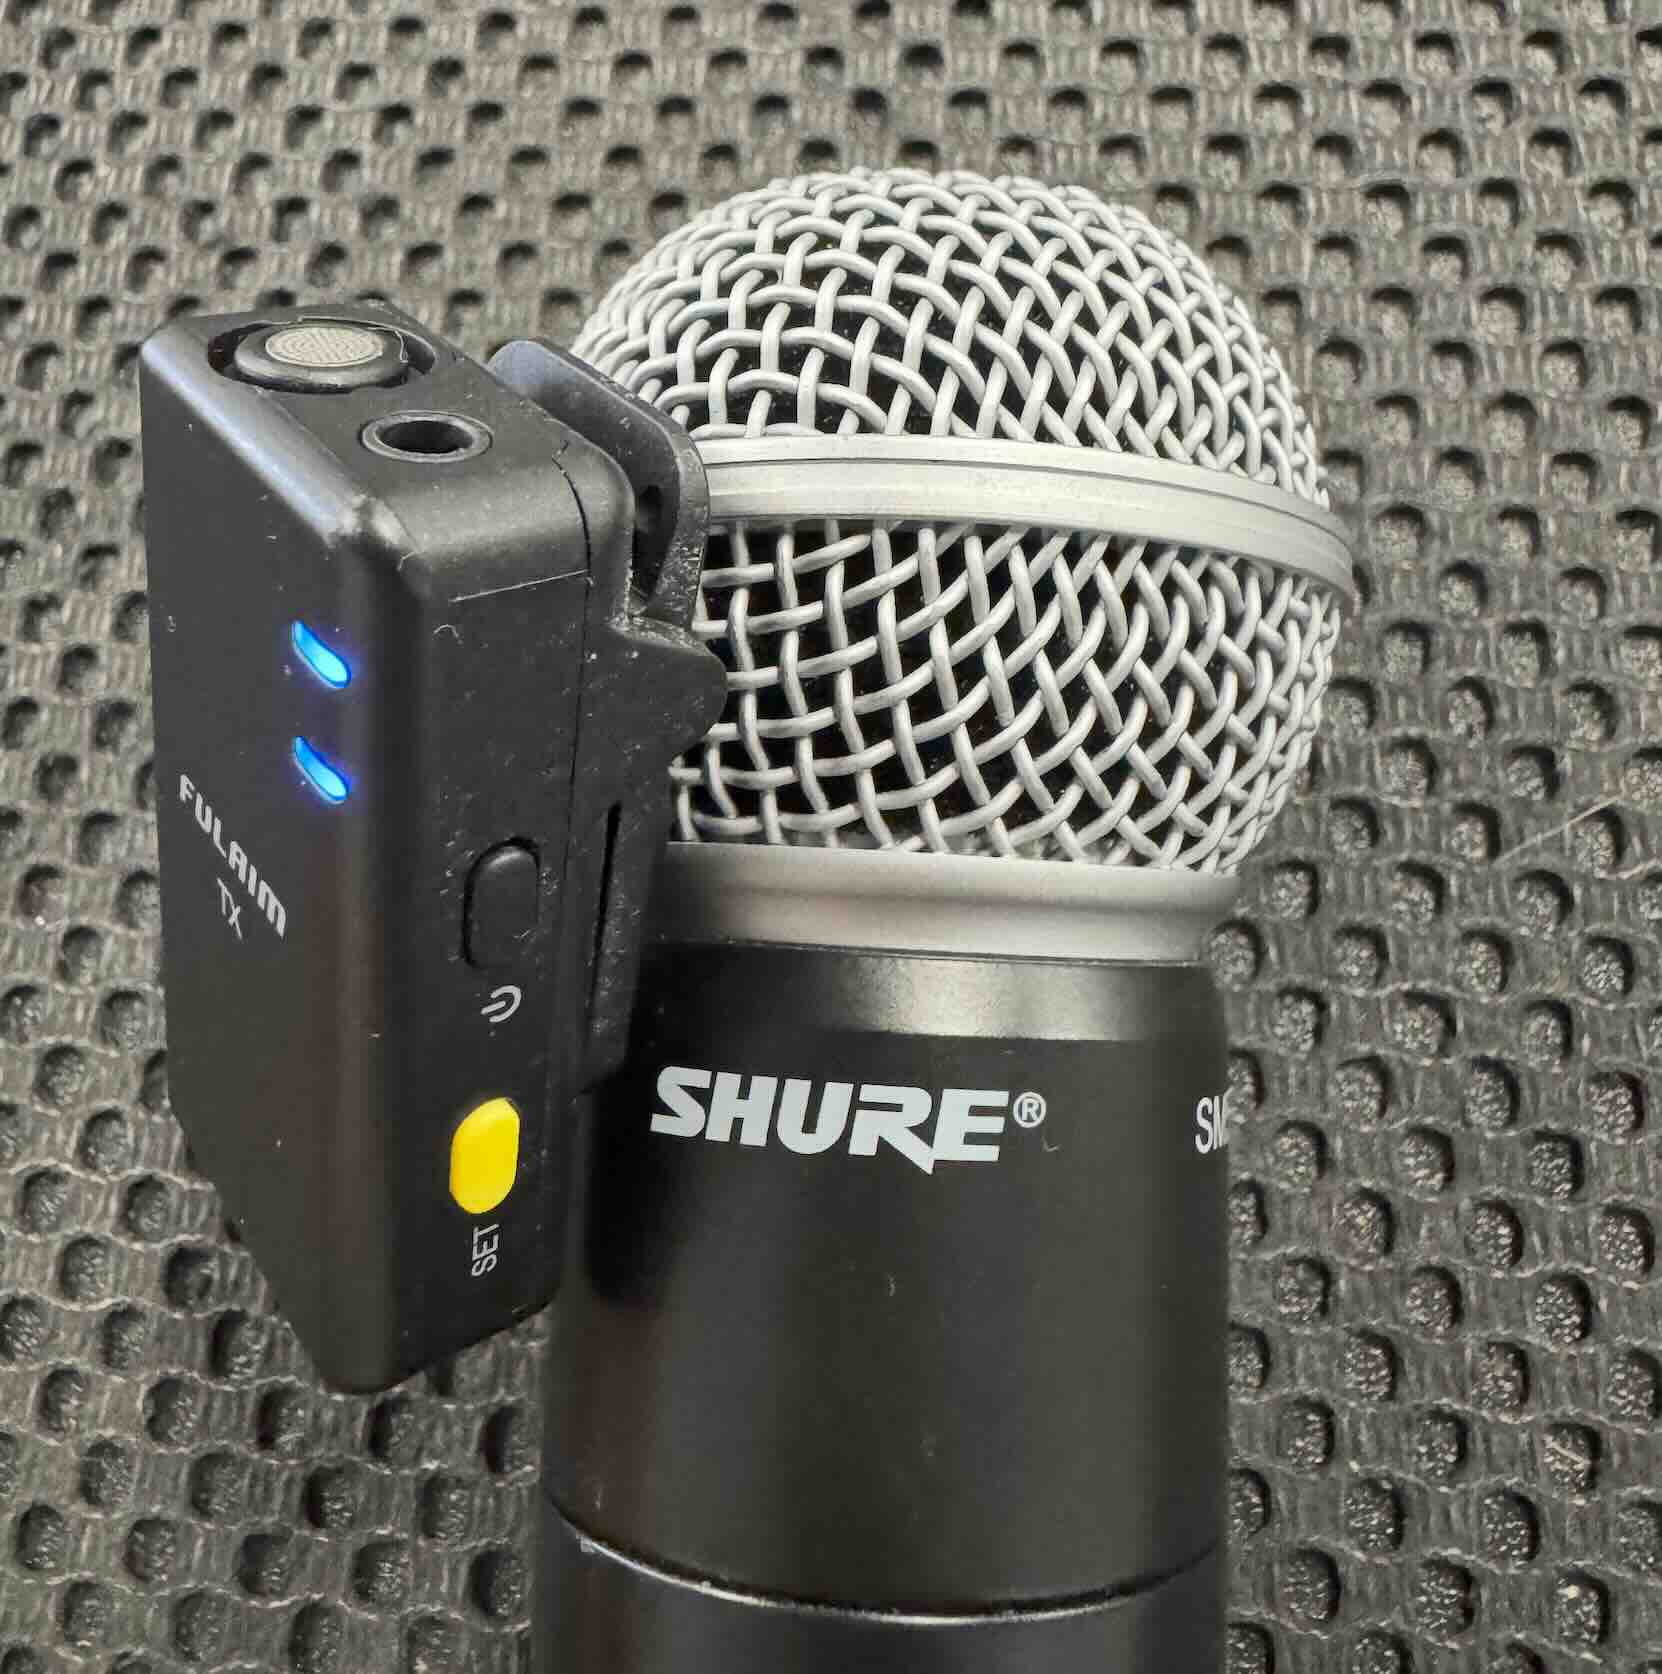
This setup shows a FULAIM TX wireless transmitter securely clipped to a Shure handheld microphone. By attaching the wireless system directly to the speaker's microphone, you capture the cleanest possible audio input, which is essential for accurate transcription and effective noise cancellation processing.
Real-Time Accuracy Monitoring
Always watch the transcription as it appears on your device. If you notice inaccuracies or missing words, this indicates you need to:
- Move closer to the speaker, or
- Reposition your wireless microphone
- Check for audio interference
Wireless Broadcast Mode
Wireless Microphone Setup
For wireless broadcast mode, a wireless microphone system is essential:
- Choose a high-quality wireless microphone
- Ensure proper frequency coordination
- Test signal strength before important events
- Have backup batteries ready
Recommended Reading: For detailed wireless microphone recommendations and reviews, check out our comprehensive guide: Top 5 Wireless Microphones for Live Translation.
Best Practices
- Position the microphone close to the primary speaker
- Use lapel or headset microphones for hands-free operation
- Test audio levels before starting
- Monitor for any signal interference
Web Broadcast Mode
Soundboard Connection
For web broadcast mode, connect directly to the soundboard or audio mixing console:
- Use direct audio output from the soundboard
- Connect via XLR, 1/4", or RCA cables
- Ensure proper gain staging
- Monitor audio levels to prevent clipping
Step-by-Step Setup Guide
Step 1: Basic Setup
- Open Hope Translator - Launch the application on your device
- Select your preferred language - Choose your source language for transcription
- Choose your audio input source - Select microphone, wireless mic, or soundboard connection
- Start speaking - Begin your speech or presentation
USB Microphone Selection
When you connect a USB microphone or wireless receiver to your mobile device, the app will automatically detect and display all connected microphones. You can then select the specific microphone you want to use from the list:
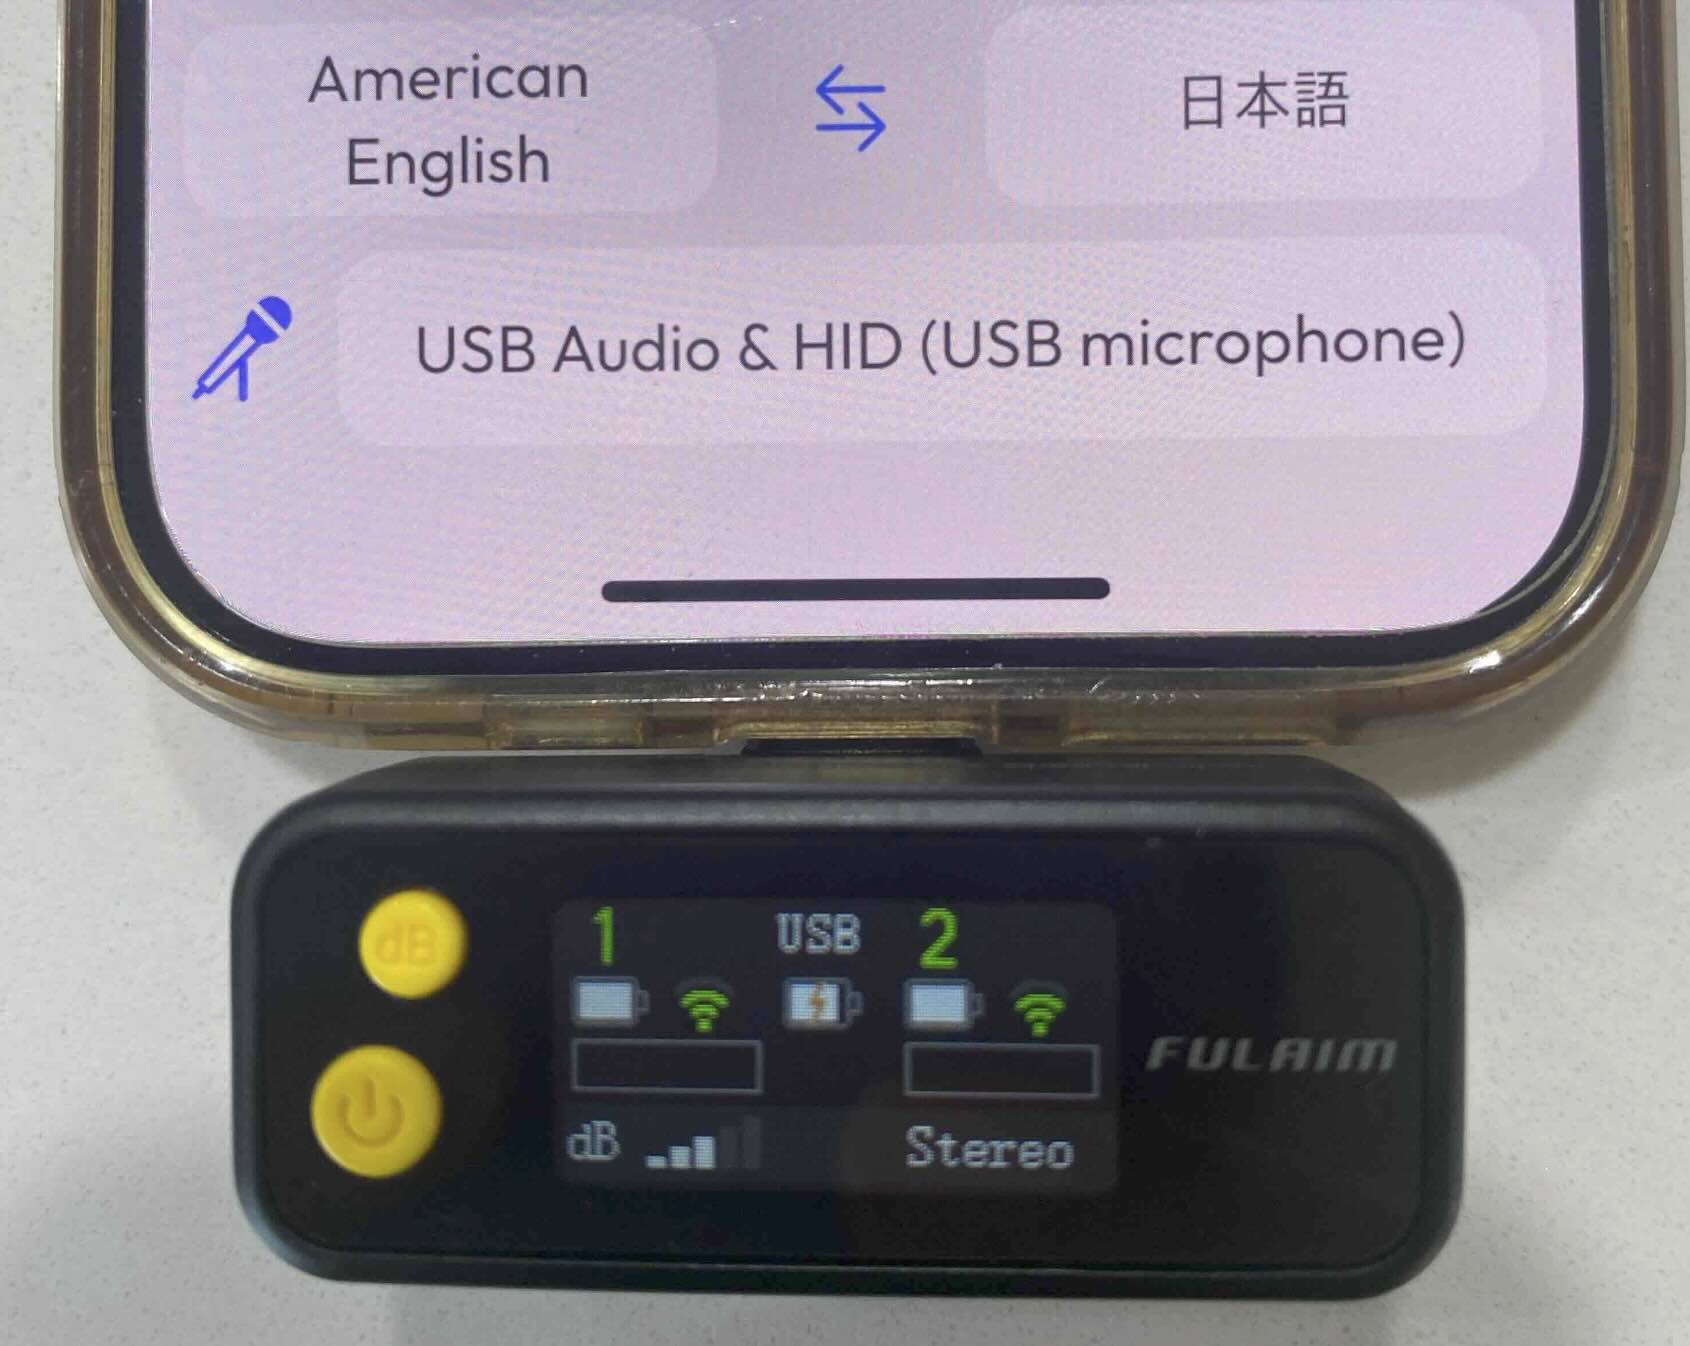
This setup shows how the FULAIM wireless receiver appears in the microphone selection list as "USB Audio & HID (USB microphone)" when connected to your phone. The receiver displays connection status, battery levels, and audio levels on its built-in screen.
Step 2: Audio Quality Optimization
- Position yourself close to the speaker - Get as close as possible for mobile solo mode
- Use wireless microphone when needed - Attach to existing equipment or place near speaker
- Connect to soundboard for web broadcast - Use direct audio output for best quality
- Test audio levels - Ensure proper gain without clipping
Step 3: Internet Connection Setup
- Connect to WiFi - Use stable internet connection whenever possible
- Test connection speed - Ensure reliable upload for real-time processing
- Check for interference - Avoid crowded WiFi networks if possible
Step 4: Monitor and Adjust
- Watch transcription accuracy - Monitor real-time text appearance
- Adjust microphone placement - Reposition if accuracy drops
- Check audio levels - Maintain optimal gain throughout session
- Verify translation quality - Ensure both transcription and translation are accurate
Professional Audio Setup
- Work with your audio technician for optimal setup
- Use dedicated audio interfaces when possible
- Test the connection before going live
Troubleshooting Common Issues
Poor Transcription Quality
If you're experiencing poor transcription accuracy:
- Check microphone placement - Move closer to the sound source
- Verify audio levels - Ensure proper gain without clipping
- Reduce background noise - Choose quieter environments
- Test equipment - Verify microphone and interface functionality
Translation Errors
When translation quality is poor:
- First, improve transcription accuracy - Translation errors often stem from transcription issues
- Check audio clarity - Ensure the AI can hear every word clearly
- Verify language settings - Confirm correct source and target languages
- Review transcription - Look for missing or garbled words
Advanced Tips
For Professional Use
- Invest in professional-grade wireless microphone systems
- Use acoustic panels to reduce room echo
- Implement proper audio monitoring systems
- Regular equipment maintenance and testing
For Casual Use
- Choose quiet locations for important recordings
- Use smartphone apps to test audio quality before starting
- Keep microphones clean and properly stored
- Learn basic audio troubleshooting techniques
Need Professional Help?
If you need assistance setting up professional audio systems:
- Contact our technical support team
- Schedule a consultation with our audio specialists
- Join our user community for tips and advice
- Request a demo of professional audio setups
Summary
Remember: Accurate transcription leads to accurate translation. By focusing on sound quality, proper microphone placement, and using the right equipment for your specific mode, you'll achieve the best possible results with Hope Translator.
Ready to improve your transcription accuracy? Visit hopetranslator.com to get started with professional-grade audio transcription and translation!