This manual explains every control and option on the Hope Translator host page so you can run live translation broadcasts confidently. Use it as a step-by-step reference before and during your broadcast.
Before every broadcast, there are two most important inputs to get right: your microphone and your .
input language
Microphone
Your microphone is the source of the audio that gets transcribed and translated.
No microphone found or no permission: If you see a message that no microphone was found or you don't have permission to access it, allow microphone access in your browser or device settings and ensure a microphone is connected.
Microphone / Microphone Volume: In Settings, select the microphone you want to use and adjust the Microphone Volume so your speech is clear but not clipping.
Play back audio (headphones recommended): This option plays your microphone input back through your device speakers so you can verify that the audio is clear. Use it to test levels before going live. Headphones are recommended when this is on to avoid feedback.
Input Language
Input Language / Select a language: Choose the language you will be speaking. Transcription and translation are based on this selection.
Channel Name and Channel ID
Channel ID and Channel Name: Each broadcast runs on a channel. The Channel Name is visible to your audience. It’s highly recommended to change it to something descriptive (e.g. “Downtown Community Church Sunday Service”) so viewers know which broadcast they’re joining.
Manage Channels: Use this to switch between channels or manage your channel list—for example, when you need multiple channels to host multiple simultaneous translations (e.g. one channel for the main sanctuary service and another for the youth service, both happening at the same time).
Visible to your audience: Reminder that the channel name is what your audience sees.
Subscription Plan and Usage
Subscription Plan: Your plan determines your translation quota. Use Manage Subscription to upgrade or manage your subscription.
Usage this month / reset on: Shows how much of your quota you’ve used and when it resets.
Quota Exceeded: If you’ve reached your limit, you’ll see a message that you’ve reached your translation limit for this period. Upgrade your plan to continue broadcasting.
Quota almost exceeded / Running low on quota: A warning when you’re close to your limit. You can choose Upgrade Plan or Maybe Later.
Starting Your Broadcast
Start Broadcasting
Start Broadcasting: Use this to open or confirm the broadcast session and get the URL for your audience to join and the QR code for your audience to join. The QR code and link remain the same for this channel so you can reuse them for future sessions on the same channel.
Start and Stop Translation
Start Translation: Begins real-time transcription and translation. Your audience will see text (and optionally hear AI voice) in their chosen languages.
Stop Translation: Stops the live translation. The broadcast channel can stay open so you can start again without changing the link or QR code.
Clearing and Previewing
Clear existing translations: Removes all current transcription and translation text on screen for all viewers. Use this when you want to start with a clean slate (e.g. new segment or topic).
Demo Mode
Demo mode: Turn this on to use a pre-recorded sample speech to test transcription, translation, and broadcast without speaking. Normal usage quota still applies.
If no sample is available for your selected input language, you may be asked whether you want to Use English sample audio instead.
Start Your Broadcast: After enabling demo mode, click the play button to start the demo broadcast and see live transcription and translation in action.
Share QR Code: After clicking Start for the demo, tap Share to show the QR code so viewers can scan and listen to the live translation.
Translation and Display Options
Sentence length: Shorter – shorter sentences appear faster but may reduce accuracy. More complete – waits for longer, more complete sentences. Choose based on your speaking style and preference for speed vs. completeness.
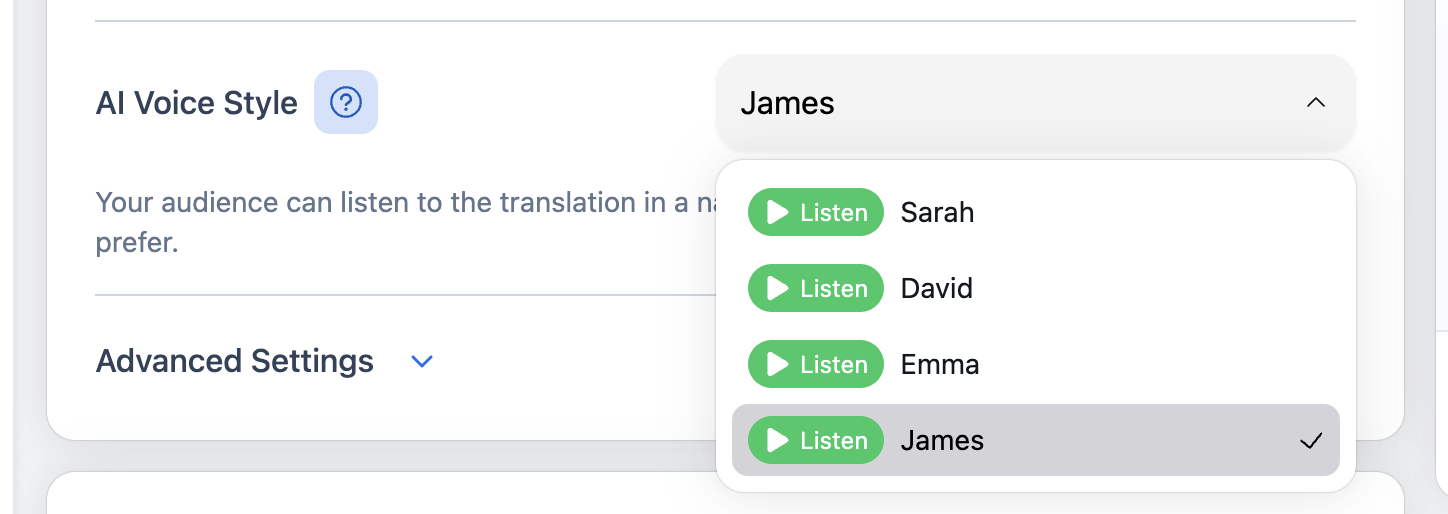
AI Voice Style: Your audience can listen to the translation in a natural, lifelike AI voice. You can choose a male or female voice depending on the event. Click the Listen button next to each option to hear how they sound before selecting.
Advanced Settings (Audio)
Auto gain control: Automatically adjusts microphone input volume to keep levels more consistent (boosts soft sounds, reduces loud ones).
Echo cancellation: Prevents your speaker output from being picked up by your microphone (stops feedback/looping).
On / Off / Default: Use these to enable, disable, or reset to default for each option.
During the Broadcast
Preview
Preview Translation / Preview translation: Opens a preview so you (the host) can see what the real-time transcription looks like. Select a language to see what the translation would be for your audience—by default, No translation needed is selected so you only see the source-language transcription. This language option is only for your own preview.
Sharing With Your Audience
Link and QR Code
URL for your audience to join: The direct link viewers use to join your channel. The link is useful in many situations—for example, post it on your website or event page, send it in a text message or email, add it to a slide or announcement, or share it in a chat or social post.
QR code for your audience to join: Viewers can scan this with their phone to open the same link. You can choose Hide, Small, or Large display, and Download the QR code to use on slides or handouts.
Share / Invite your audience to join this channel: Use Share to open the share dialog.
Download QR code: Saves the QR code image.
Use this link to join this channel: Copy this link to share manually (e.g. paste into a text, email, or website).
For Your Viewers
When your audience opens the join link or scans the QR code, they see the viewer page. You can share this overview with them or use it when answering questions.
Selecting a language
Language / Select a language: Viewers choose which language they want the speech translated into. Each person can pick a different language (e.g. Spanish, Korean, Vietnamese). The translation and, when available, the AI voice follow this choice.
Show or hide original and transcription
Show Original / Hide Original: Toggle whether the original (source) text is shown above or alongside the translation. Hiding the original gives a cleaner view when they only need the translated text.
Show Transcription / Hide Transcription: Toggle the live transcription (what’s being said in the source language). Viewers can show both translation and transcription, or only the translation.
Font size and display
Adjust Font Size / Font Size: Viewers can make the text larger or smaller for readability on their device.
Light Mode / Dark Mode: Switch between light and dark theme. Dark mode is easier on the eyes in low light (e.g. in a dimmed room or at night).
Header and extra options
Always Show Header / Auto Hide Header: The header (with language, settings, etc.) can stay visible or auto-hide to maximize space for the translation text.
Listening to the translation
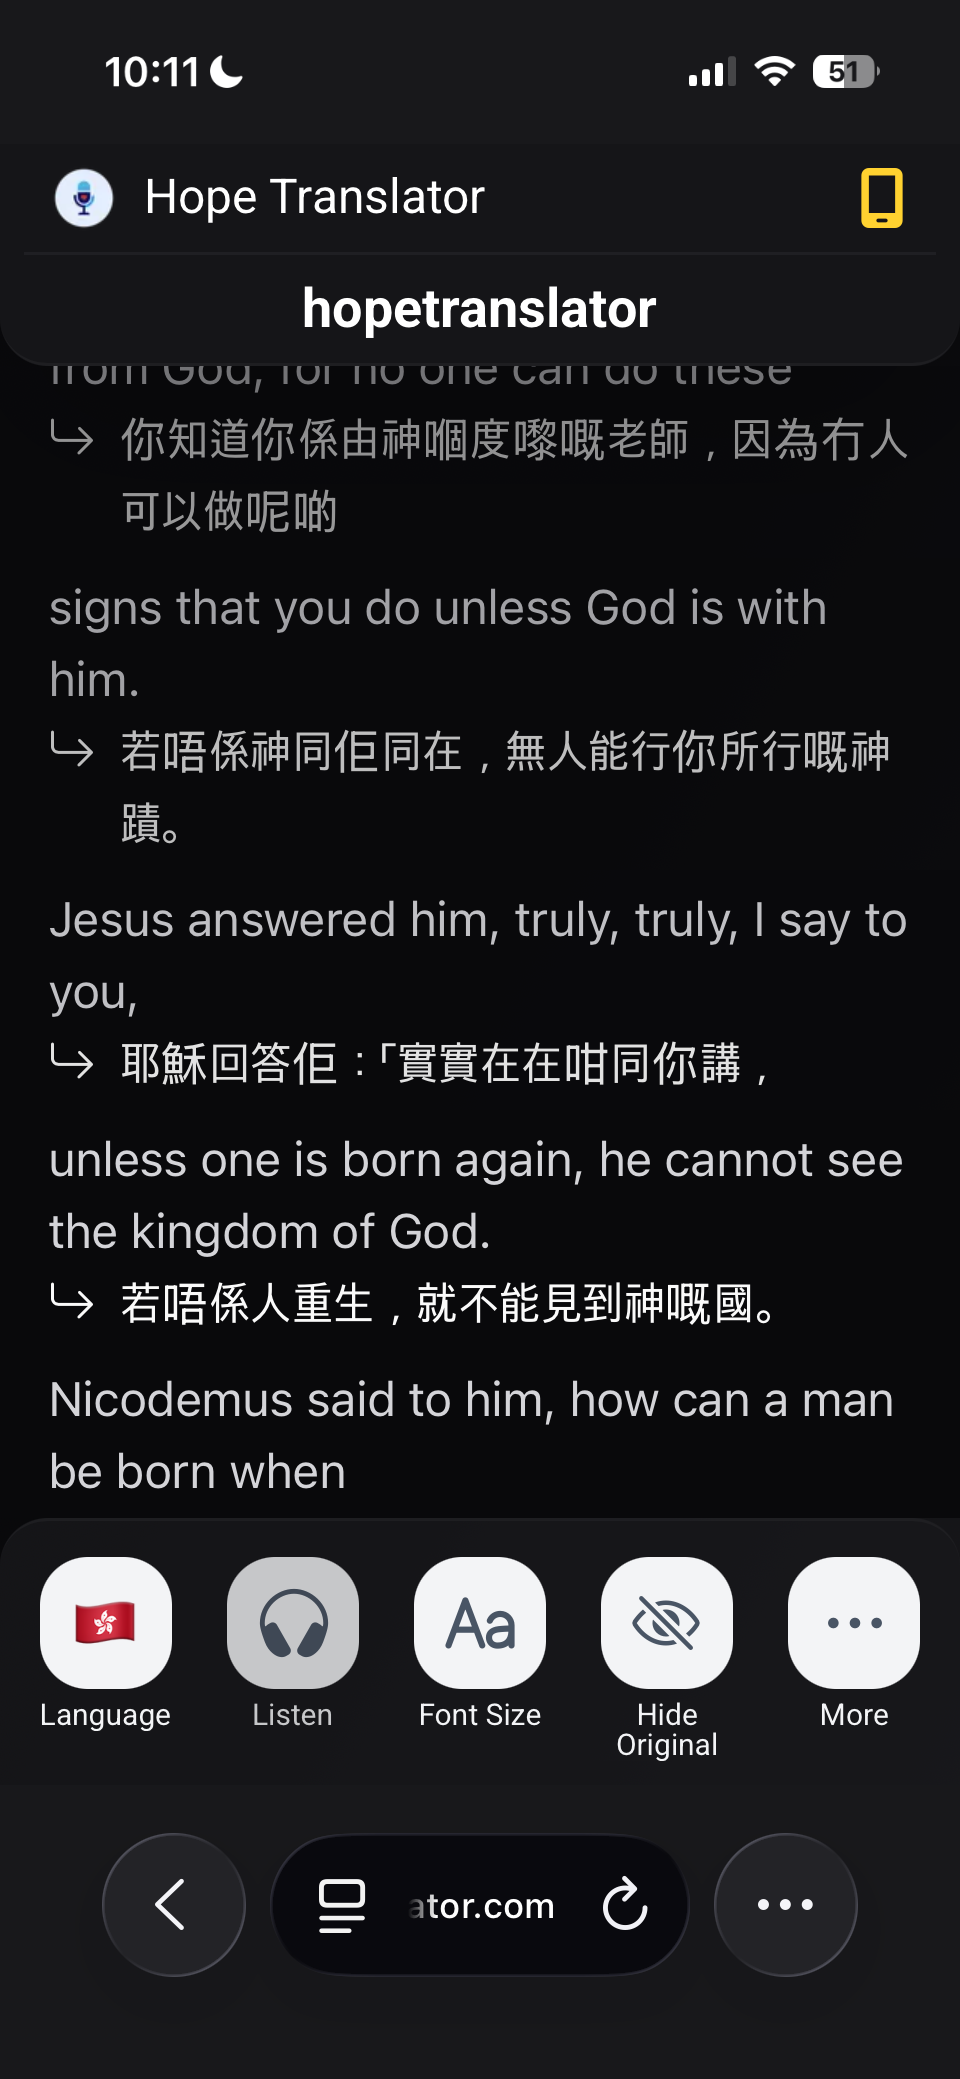
Listen: When AI voice is enabled for the broadcast, viewers can tap Listen to hear the translation read aloud in their selected language (typically in the mobile app).
Playback (audio) and quality
Speed: Adjust how fast the AI voice plays back.
Playback Mode: Auto—speed adjusts automatically to catch up when needed. Manual—viewer chooses a fixed speed.
Show Transcription Quality Score / Hide Transcription Quality Score: Optional indicator of how confident the system is in the transcription (useful for technical or noisy audio).
Sharing and connection
Share link with neighbors: Viewers can share the same channel link with others (e.g. Invite others to scan this QR code to join the channel).
Reconnecting... / Connected / Connection lost...: Status of the live connection. If the host hasn’t started yet, they see Waiting for host....
Channel not found: Shown if the channel doesn’t exist or was removed. Viewers can Return to home page to try another link.
Mobile broadcast app
You can also host a live broadcast directly from the Hope Translator mobile app, available on both iOS and Android. All you need is your phone—no extra equipment required. Modern iPhone and iPad microphones now provide very good voice quality for most live translation scenarios. For clearer audio (especially outdoors or in noisy spaces), you can connect a wireless microphone so your voice stays clear for everyone listening or reading along. This makes it easy to run events like outdoor services, small groups, or classes where people join by scanning a QR code or opening a link on their own devices. For a step‑by‑step walkthrough, see How to broadcast live from the mobile app.
On mobile devices: You can drag the middle bar between the Preview and Input Language sections to resize the panels—drag it up to give more space to the preview screen.
The mobile app also has solo mode for individual users wanting to use the app or carry out conversations.
Presentation and Streaming Software (Screen Overlay)
Presentation and Streaming Software: Configure a screen overlay for use in ProPresenter, OBS, or other presentation or streaming software. Add the overlay as a browser source pointing to the Screen overlay URL.
Add Screen: Create a new overlay screen. You’ll be asked to enter a Name (e.g. “Main sanctuary”).
Screen overlay URL: This is the URL you add as a browser source in ProPresenter, OBS, or similar. Each screen can have its own URL.
Edit / Delete: Edit the name or settings of a screen, or delete it. You’ll be asked Are you sure you want to delete? before removing.
Save: Saves changes to the overlay configuration.
Overlay appearance
Background color: Color behind the text.
Margin left / Margin right / Margin top / Margin bottom: Spacing from the edges of the overlay.
Vertical alignment / Horizontal alignment: Where the text sits (e.g. bottom center).
Text color / Text background color: Text and its background.
Font size / Line height: Size and spacing of the text.
Text alignment: Left, center, or right.
Max number of lines: How many lines of text to show at once.
Letter case: Normal, Uppercase, Lowercase, or Capitalize.
Text shadow size / Text shadow color: Optional shadow for readability.
Instant Speech Preview: Shows words as soon as they are spoken for a faster, live feel. Text may update slightly as accuracy improves. Turning this off is recommended for most scenarios to avoid flickering. This option is only available when No translation needed is selected (transcription-only mode).
Keywords
Keywords help the speech-to-text system recognize names, places, and other terms you use often—so transcription is more accurate and consistent. Add them here before or during your broadcast.
Keywords: You can add important words or phrases (names, places, special terms) so the speech-to-text system recognizes them better.
Keywords description: Teach the speech-to-text transcription system to better understand important words or phrases you use often.
Keywords add: Add new keywords. Note: This feature is not yet supported for all input languages; the app will show This feature is not yet supported for the following input languages where it applies.
Usage and Quota
Usage this month / reset on: Check how much quota you’ve used and when it resets.
Subscription Plan / Change: Manage or upgrade your plan when you need more quota.
Quota Exceeded / Quota exceeded message: When you’ve reached your limit, you’ll see that you’ve reached your translation limit for this period and can Upgrade your plan to continue.
Running low on quota / Quota almost exceeded: Early warning so you can upgrade or plan ahead.
Manage subscription
If you have subscribed to a plan, you will see the Manage subscription option at hopetranslator.com.
From the host page or your account, you can view your current plan, upgrade for more quota, or cancel when you don’t need ongoing access.
View your existing subscription: You can see your current plan and what’s included (e.g. quota, features) from the host page or your account settings.
Upgrade to other plans: Use Subscription Plan → Change (or Upgrade Plan when you’re low on quota) to switch to a higher tier with more translation time or additional features.
Cancel your subscription: You can cancel when you don’t need ongoing access. This is especially useful for event organizers who run events only a few times a year—subscribe when you need it and cancel when you don’t, then resubscribe before your next event.
Teams
You can add others to join your team channel so they can broadcast using the team’s channels and quota. Make sure they already have an account with Hope Translator first—if they don’t, have them sign up for a free account and try again. When you create a team, a new channel is created for that team; adding team members is also how you create and share access to new channels.
You are the admin of this team: As team admin, quota usage is based on your subscription.
You are a member of this team: As a member, usage is based on the team admin’s account subscription.
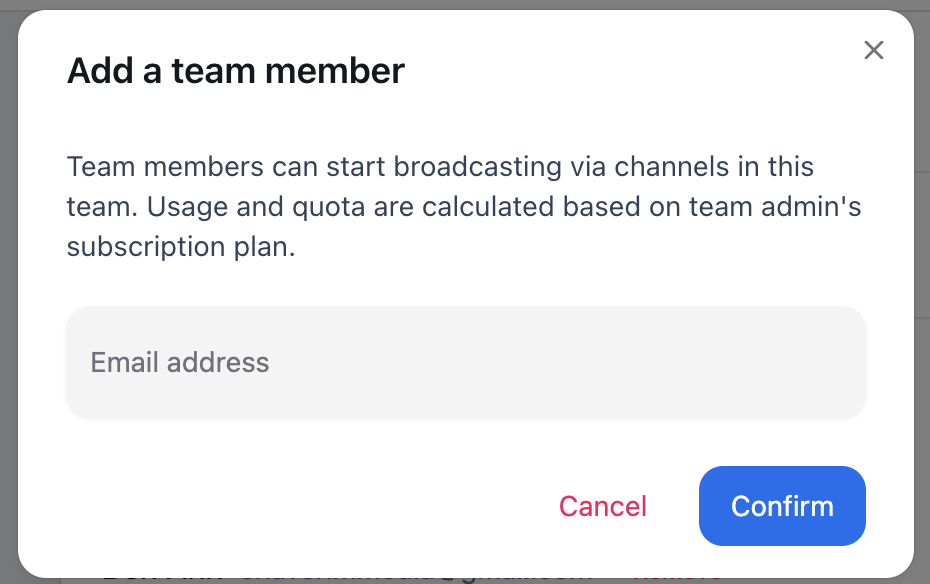
Create a new team / Create a team: Create a team and invite members so they can broadcast using channels in this team without needing their own subscription. Team members can start broadcasting via channels in this team; usage is based on the team admin’s subscription plan.
Enter team name / Team name / Confirm / Cancel: When creating or editing a team.
Add a team member / Email address: Invite by email. If we could not find a person with this email in our system, they need to sign up for a free account first.
Remove: Remove a member. You’ll be asked Are you sure you want to remove [name] ([email]) from this team?
No members in this team yet: Shown when the team has no members.
Personal channels / Team channels: Distinguish between your own channels and the team’s channels.
History
History: View past broadcasts.
Title / Start time / Summary / Transcript / Duration: Each past session can show a title, start time, summary, transcript, and duration.
Transcript coming soon: Translate to other languages and paragraph formatting for transcripts may be coming later. I want this feature lets you express interest.